Renewing a Third Party .local SSL Cert
Since I have got quite a few questions on SSL certificates for Exchange Server 2007 and 2010 lately I decided to write this post about the subject. The reason why SSL is a hot topic right now is that third party Certificate Authorities have begun to phase out the issuance of SSL certificates containing internal DNS names. The phrase “internal names” refers to DNS names that are not registered and/or cannot be registered as domains in your possession.
Historically, handling SSL certificates for an Exchange organization was an easy task. It was just a matter of running the New-certificate wizard from the EMC or EMS. You just included the names that you registered with your domain registrar and the default host names of your Exchange servers – which always default to the netbios name of the server + the AD domain’s domain suffix. It was also common to register just the NetBIOS name of all Client Access Servers. Even IP addresses could be included.
No configuration of the Exchange CAS servers was needed (apart from installing the SSL certificate). Everything worked fine for years and everyone was happy. Often the certificates had several names in them. It was not unusual for an SSL certificate from trusted third party CA to contain six or more names. A sample certificate:
Mail.mikeonline.se
Autodiscover.mikeonline.se
Cas1.mikeonline.local
Cas2.mikeonline.local
Mail1
Mail2
legacy.mikeonline.se
Now, when it is time to renew the certificate the third party CA will not allow you to renew it. A little google research on how to remedy this gives you several complex solutions. Some of the suggestions will cost a lot of money and effort.
Digicert, which is one of the most reputable third party certificate issuers, suggest that you in this situation should consider renaming your Active Directory domain or, if Exchange is already installed, migrate your Exchange installation to new hard ware.
Others suggest a mix of trusted third party CA certificates and SSL certificates issued from a private CA. It is possible to issue your own certificates and mix public and private certificates.
Making the right decision
Personally I wouldn’t recommend any of the above suggestions. Renaming an Active Directory domain is something that is not done in a jiffy and must be carefully planned and tested in a virtual environment first. If you suggest something like that it might just be that your customer decides for some cheaper solution he has been looking at (like a hosted solution or something similar). In the worst case you might even lose the customer.
A migration is a lot easier than a rename, but would mean that you have to purchase new hardware for the new Active Directory Forest. The cost of this would most likely deter your customer, so we won't do this, unless it is time to upgrade the server hardware anyway.
Purchasing an advanced reverse proxy solution like TMG or Sophos is a major improvement of your network, but it should not be purchased just because an SSL certificate hast to be renewed.
If your company is growing you might be forced to redesign your AD structure, but that is another problem that is not related to the issuance of an SSL certificate. Solve the SSL problem first, and, if you think it is necessary, solve the AD redesign problem afterwards. You will be able to use the same certificate if you later redesign your Active Directory infrastructure.
Split DNS
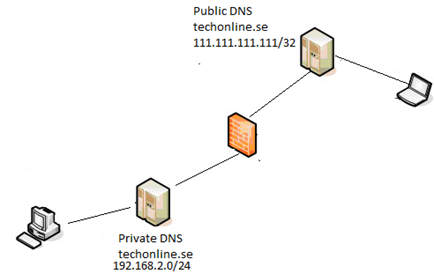
More and more Exchange administrators turn to Split DNS to avoid the problems with configuration of network applications that need to have different configurations depending on if the user is within the company network or outside.
In a split DNS infrastructure, you create two totally separated zones for the same domain, one to be used by the internal network, the other used by the external network and one to be used by the internal network. Split DNS directs internal hosts to an internal domain name server for name resolution and external hosts are directed to an external domain name server for name resolution.

The downside with split dns is that there is a little more administrative overhead since you always have to update both the internal and the external zone when you make changes to your DNS infrastructure. The upsides, however, by far outweigh the downsides. The certificate can be used for both Internal and external clients and there is no need to reconfigure applications when you move between LAN and WAN. The steps involved when configuring split DNS for Exchange are the following:
- Establishing the Public Presence for Exchange
- Creating the Internal Names and Hosts
- Enabling Round Robin
- Configuring the CAS Servers with correct Host Names and URL:s
- Installing the SSL Certificate
Establishing the Public Presence
Log in to your domain registrar's domain c-panel and check out what names are registered. Add an A record for autodiscover if there isn't one. If there is a srv record for autodiscover you should remove it. The srv record should be used only if autodiscover is not included as a name in the certificate.
| Host | TTL | Type | Data |
|---|---|---|---|
| @ | 60 | A | 218.21.12.20 |
| www | 60 | C | @ |
| 60 | A | 218.21.12.20 | |
| autodiscover | 60 | A | Data |
| mikeonline.se | 60 | MX | mail.mikeonline.se |
| mikeonline.se | 60 | TXT | "v=spf1 include:outbound.mailhop.org ~all" |
The three names that we need for our certificate in this case are autodiscover.mikeonline.se, mail.mikeonline.se and legacy.mikeonline.se.. The A record for legacy is needed to access the 2007 servers in your network.
Creating the Internal Domain and Hosts
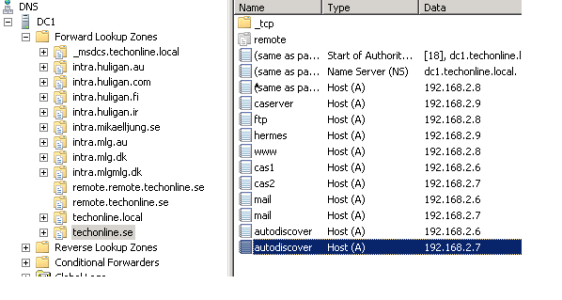
On the internal DNS servers we create a zone with the same name as the external DNS domain. A Records for both of my Client Access Servers (CAS1 and CAS2) are also created. We also create two records for mail that point to CAS1 and CAS2 respectively. The reason is that we do not want to include the individual server names in the certificate. In the case of autodiscover that would not be possible since the name must be exactly autodiscover.

Enabling Round Robin
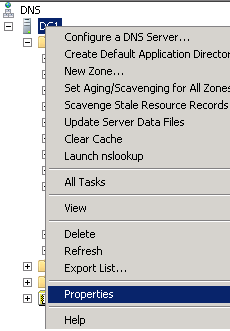
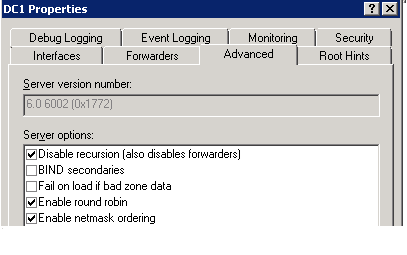
With round-robin we can load balance requests for mail.mikeonline.se to go to cas1 the first time, to cas2 the second time, to cas1 the third time and so on. In lack of a business grade load balancer like Kemp or F5 we use Round Robin. The reason is that it easy to set up. We don’t use NLB since the Microsoft Exchange Team no longer recommends NLB clusters for load balancing CAS servers. Here is how we enable Round Robin:
- Select the server object
- Right click and select properties

- Select the Advanced tab
- Check Netmask Ordering and Round Robin and click Apply

Configuring the CAS Servers with the Correct Host Names and URL:s
The host names needed in an Exchange ssl certificate are the host names used by the applications or services that make ssl connections to Exchange. Among these applications Outlook Anywhere is configured to use a domain name and the other applications should be configured to point at the virtual directories that they are bound to. The host names and URL:s are to be set on the CAS servers. In the time of Excange 2003 you could not easily change these names. In Exchange 2007 and later you can. When Exchange 2007 and 2010 first was released nobody m knew hot to change the names. The technicians included the internal host names and URL:s that were configured automatically by the installation and then added the registred external names that were registered with a domain registrar. But, things have changed: now when you want to renew these certificates you will notice that there is no registrar who will register the internal names for you any more. Technicians get stressed and think they will have to rename their AD domain to a public name. But, now worries! You can change the hostnames for each application by using Powershell commands or the EMC!
PowerShell is a good option for this task. As you will see further down it is possible to pipe the result of one command into another command in a good old UNIX fashion. The |fl that can be seen at the end of the view configuration part instructs PowerShell to Format the resulting List in an orderly fashion.
The hosts and URL:s are as follows:
- Outlook Anywhere Externally: mail.mikeonline.se
- Outlook Anywhere Internally: mail.mikeonline.se
- Outlook Web App Externally: https://mail.mikeonline.se/owa
- Outlook Web App Internally: https://mail.mikeonline.local/owa
- Exchange Control Panel Externally: https://mail.mikeonline.se/ecp
- Exchange Control Panel Internally: https://mail.mikeonline.local/ecp
- Exchange ActiveSync Externally: https://mail.mikeonline.se/Microsoft-Server-ActiveSync
- Exchange ActiveSync Internally: https://mail.mikeonline.se/Microsoft-Server-ActiveSync
- Exchange Web Services Externally: https://mail.mikeonline.se//EWS/Exchange.asmx
- Exchange Web Services Internally: https://mail.mikeonline.se//EWS/Exchange.asmx
- Offline Address Book Externally: https://mail.mikeonline.se/OAB
- Offline Address Book Internally: https://mail.mikeonline.se/OAB
- Autodiscover internally: https://mail.mikeonline.se/Autodiscover/Autodiscover.xml
- Autodiscover externally: https://mail.mikeonline.se/Autodiscover/Autodiscover.xml
The easiest way to change all the names and URL:s is by using Powershell. Powershell, of course, needs to know on which servers the commands are to be run. The server name can be specifield using the -server argument together with the Powershell command. But, the task can be simplified by first using a Powershell command to find all the CAS server in the organisation and then pipe that command into the actual command that is used for setting the host names and URL:s for the different virtual directories Note that I start every command by first displaying the current configuration:
[PS] C:\>Get-OutlookAnywhere | Select Server,ExternalHostname,Internalhostname
|fl
...............
[PS] C:\>Get-OutlookAnywhere | Set-OutlookAnywhere -ExternalHostname
mail.mikeonline.se -InternalHostname mail.mikeonline.se
-ExternalClientsRequireSsl $true –InternalClientsRequireSsl $true
-DefaultAuthenticationMethod NTLM
...............
[PS] C:\>Get-OwaVirtualDirectory | Select Server,ExternalURL,InternalURL | fl
...............
[PS] C:\>Get-OwaVirtualDirectory | Set-OwaVirtualDirectory -ExternalUrl
https://mail.mikeonline.se/owa -InternalUrl https://mail.mikeonline.se/owa
Get-EcpVirtualDirectory | Select Server,ExternalURL,InternalURL | fl
...............
[PS] C:\>Get-EcpVirtualDirectory | Set-EcpVirtualDirectory -
ExternalUrl https://mail.mikeonline.se/ecp -InternalUrl
https://mail.mikeonline.semikeonline.se/ecp
...............
[PS] C:\>Get-ActiveSyncVirtualDirectory | select Server,ExternalURL,InternalURL
| fl
...............
[PS] C:\>Get-ActiveSyncVirtualDirectory | Set-ActiveSyncVirtualDirectory
InternalUrl https://mail.mikeonline.se/Microsoft-Server-ActiveSync
-ExternalUrl https://mail.mikeonline.se/Microsoft-Server-ActiveSync
...............
[PS] C:\>Get-WebServicesVirtualDirectory | Select Server,ExternalURL,InternalURL
| fl
...............
[PS] C:\>Get-WebServicesVirtualDirectory | Set-WebServicesVirtualDirectory
-ExternalUrl https://mail.mikeonline.se/EWS/Exchange.asmx -InternalUrl
https://mail.mikeonline.se/EWS/Exchange.asmx
...............
[PS] C:\>Get-OabVirtualDirectory | Select Server,ExternalURL,InternalURL | fl
...............
[PS] C:\>Get-OabVirtualDirectory | Set-OabVirtualDirectory -ExternalUrl
https://mail.mikeonline.se/OAB -InternalUrl https:// mail.mikeonline.se/OAB
...............
[PS] C:\>Get-ClientAccessServer | Select Name,AutoDiscoverService, InternalURI
| fl
...............
[PS] C:\>Get-ClientAccessServer | Set-ClientAccessServer
–AutoDiscoverServiceInternalUri
https:// mail.mikeonline.se/Autodiscover/Autodiscover.xml
Installing the SSL Certificate
With all the names configured we actually end up with only three names to include in the certificate:
Mail.mikeonline.se
Autodiscover.mikeonline.se
legacy.mikeonline.se
It is now time to create and install the certificate
- Run the New-Certificate Wizard and create request for an SSL certificate
- Submit the certificate request to Godaddy or some other company that issues trusted SSL certificates
- Complete the pending certificate request
- Export/import the SSL certificate from CAS1 to CAS2
- Assign the SSL certificate to services in Exchange
Summary
We solved the certificate problem without renaming AD, without migrating the Exchange organization to a new forest, without installing a reverse proxy and without creating a PKI infrastructure with a private CA. Probably the certificate was a lot cheaper this time too, because this time it contained only three names. Now when the problem of getting an SSL certificate is solved you can focus on other things. You could, e.g., point out to your manager that it might be a good thing to migrate the Exchange organization to a new forest. Now, when everything is working, the manager probably has other, more urgent, tasks for you to do.
